var q1 = from orderitem in q2
                     join pd in _iProductDetailContract.Entities on   orderitem.ProductDetailId equals pd.Id
                     join pm in ProductMainContract.Entities on pd.ProductMainId equals pm.Id
                     join user in UserContract.Entities on pm.BuyerId equals user.Id
                     into orderItemBuyer
                     from user in orderItemBuyer.DefaultIfEmpty()
                     group new { orderitem.Price, orderitem.Num }
                     by new { orderitem.ProductDetailId, orderitem.Name, orderitem.Size, orderitem.Price, pm.AliasName, BuyerName = user.Name }
                     into g
                     orderby g.Sum(p => p.Num) descending
                     select new
                     {
                         ProductDetailId = g.Key.ProductDetailId,
                         Name = g.Key.Name,
                         Size = g.Key.Size,
                         AliasName = g.Key.AliasName,
                         BuyerName = g.Key.BuyerName,
                         Num = g.Sum(p => p.Num),
                         Price = g.Key.Price,
                         TotlePrice = g.Sum(p => p.Num * p.Price)
                     }
                     ;
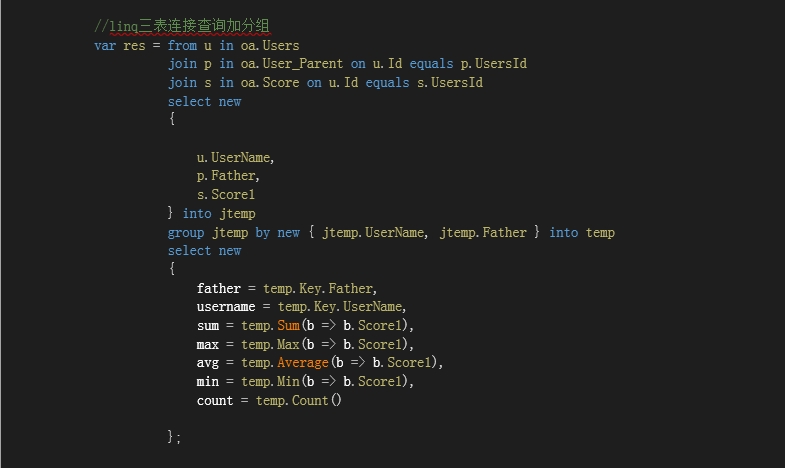
Lambda和Linq三表连接查询加分组

三表连接查询加分组的方法
方法一:Lambda
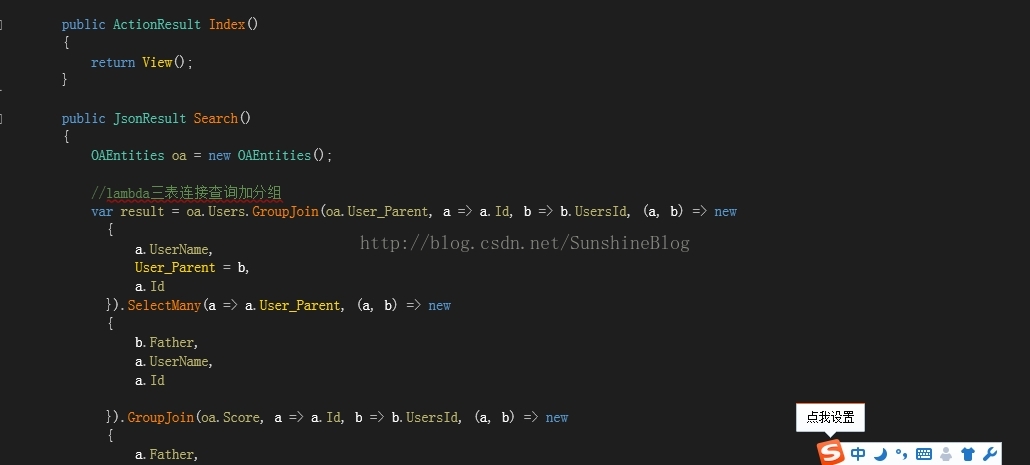
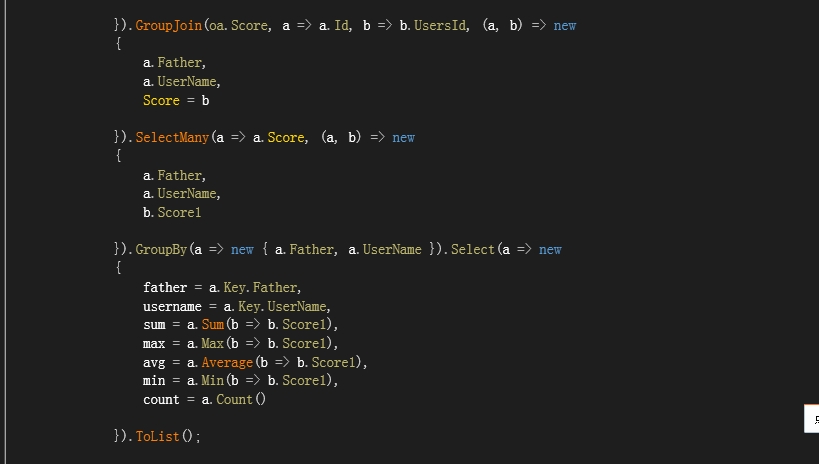
方法二:Linq
数据库事例:
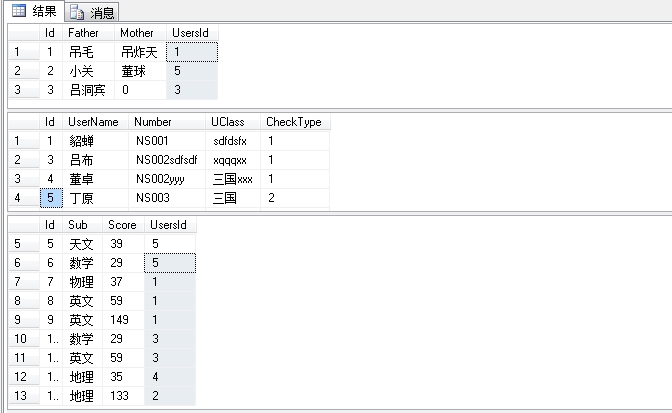
效果图:

.NetCore JWT认证

1、创建.net core web api项目:
Create a Web API with ASP.NET Core and Visual Studio
按照上面链接创建项目。
2、添加JWT(Bearer Token)认证
- 在项目的Startup.cs文件中的ConfigureServices方法添加以下代码添加并配置JWT认证:
            //添加jwt验证:services.AddAuthentication(JwtBearerDefaults.AuthenticationScheme)
    .AddJwtBearer(options => {
        options.TokenValidationParameters = new TokenValidationParameters
        {
            ValidateIssuer = true,//是否验证Issuer
            ValidateAudience = true,//是否验证Audience
            ValidateLifetime = true,//是否验证失效时间
            ValidateIssuerSigningKey = true,//是否验证SecurityKey
            ValidAudience = Configuration["audience"],//Audience
            ValidIssuer = Configuration["issuer"],//Issuer,这两项和签发jwt的设置一致
            IssuerSigningKey = new SymmetricSecurityKey(Encoding.UTF8.GetBytes(Configuration["SecurityKey"]))//拿到SecurityKey
        };
     });
其中 Configuration[“audience”]、Configuration[“issuer”]、Configuration[“SecurityKey”]为读取项目中appsettings.json文件中的自定义字符串。
appsettings.json文件:
{
  "Logging": {
    "LogLevel": {
      "Default": "Warning"
    }
  },
  "AllowedHosts": "*",
  "SecurityKey": "dd%88*377f6d&f£$£$#$%#$%#$FF33fssDG^!3",
  "issuer": "guetServer",
  "audience": "guetClient"
}- 在项目的Startup.cs文件中的Configure方法添加以下代码配置授权:
app.UseAuthentication();//配置授权- 签发JWT
首先自定义API连接返回的数据类型在项目的Models文件夹添加RestfulData类,新建类文件,对应命名空间里面定义三个类,代码如下:
    public class RestfulData
    {
        /// <summary>
        /// <![CDATA[错误码]]>
        /// </summary>
        public int code { get; set; }

        /// <summary>
        ///<![CDATA[消息]]>
        /// </summary>
        public string message { get; set; }

        /// <summary>
        /// <![CDATA[相关的链接帮助地址]]>
        /// </summary>
        public string url { get; set; }

    }

    /// <summary>
    ///
    /// </summary>
    /// <typeparam name="T"></typeparam>
    public class RestfulData<T> : RestfulData
    {
        /// <summary>
        /// <![CDATA[数据]]>
        /// </summary>
        public virtual T data { get; set; }
    }

    /// <summary>
    /// <![CDATA[返回数组]]>
    /// </summary>
    /// <typeparam name="T"></typeparam>
    public class RestfulArray<T> : RestfulData<IEnumerable<T>>
    {

    }
在项目中Models文件夹新建TokenObj类,代码如下
    public class TokenObj
    {
        public string token { get; set; }//token内容

        public long expires { get; set; }//过期时间
    }
做好以上准备之后在项目的Controllers文件夹里面新建一个API控制器类,如下图:

命名为OAuthController.cs。
将里面的方法全部删除,添加入以下代码
        private readonly IConfiguration _configuration;

        public OAuthController(IConfiguration configuration)
        {
            _configuration = configuration;
        }

        /// <summary>
        /// <![CDATA[获取访问令牌]]>
        /// </summary>
        /// <param name="user"></param>
        /// <param name="password"></param>
        /// <returns></returns>
        [HttpPost]
        public async Task<RestfulData<TokenObj>> Token(string user, string password)//同步方法
        {
            var result = new RestfulData<TokenObj>();
            try
            {
                if (string.IsNullOrEmpty(user)) throw new ArgumentNullException("user", "用户名不能为空!");
                if (string.IsNullOrEmpty(password)) throw new ArgumentNullException("password", "密码不能为空!");

                //验证数据库用户名和密码
                //var userInfo = await _UserService.CheckUserAndPassword(user,  password);
                var claims = new Claim[]
                {
                    new Claim(ClaimTypes.Name,user),
                    new Claim(ClaimTypes.NameIdentifier,password),
                };

                var key = new SymmetricSecurityKey(System.Text.Encoding.UTF8.GetBytes(_configuration["SecurityKey"]));
                var expires = DateTime.Now.AddDays(30);//
                var token = new JwtSecurityToken(
                            issuer: _configuration["issuer"],
                            audience: _configuration["audience"],
                            claims: claims,
                            notBefore: DateTime.Now,
                            expires: expires,
                            signingCredentials: new SigningCredentials(key, SecurityAlgorithms.HmacSha256));

                //生成Token
                string jwtToken = new JwtSecurityTokenHandler().WriteToken(token);
                result.code = 200;
                result.data = new TokenObj() { token = jwtToken, expires = expires.ToFileTimeUtc() };
                result.message = "授权成功!";
                return result;
            }
            catch (Exception ex)
            {
                result.message = ex.Message;
                result.code = 400;
                // logger.Error("获取访问令牌时发生错误!", ex);
                return result;
            }
        }
下面添加Swagger UI并验证JWT认证。
3、添加Swashbuckle
Get started with Swashbuckle and ASP.NET Core
按照上面链接添加Swagger UI
- 在Swagger中添加JWT认证功能
在startup.cs文件中的ConfigureServices方法中的services.AddSwaggerGen配置末尾添加以下代码
                c.AddSecurityDefinition("Bearer",
                    new ApiKeyScheme {
                        In = "header",
                        Description = "请输入OAuth接口返回的Token,前置Bearer。示例:Bearer {Roken}",
                        Name = "Authorization",
                        Type = "apiKey"
                    });
                c.AddSecurityRequirement(
                    new Dictionary<string, IEnumerable<string>>
                    {
                        { "Bearer",
                          Enumerable.Empty<string>()
                        },
                    });
4、调试
在项目内置的ValuesController中给Get方法添加[Authorize]标签,如下图所示:

调试项目,进入Swagger UI页面,url为http://localhost:<port>/swagger进行调试。
直接请求GET /api/Values
点击Try it out,再点Execute可见Server response的code是401,未授权: (Unauthorized)

我们尝试OAuth接口获取Token,user password随便输入,可以看到返回的数据有一个token。我们将它复制备用。

点击页面上端的Authorize按钮,按如下图格式输入我们刚刚复制的token,前面带有Bearer,与复制的token间隔一个空格。

再点击Authorize按钮,关闭对话框,然后再去尝试GET /api/Values接口吧!

返回结果正确,DONE!!!!
生成的token超长,尚未知道如何刷新token。
CSS实现垂直居中的常用方法

在前端开发过程中,盒子居中是常常用到的。其中 ,居中又可以分为水平居中和垂直居中。水平居中是比较容易的,直接设置元素的margin: 0 auto就可以实现。但是垂直居中相对来说是比较复杂一些的。下面我们一起来讨论一下实现垂直居中的方法。
首先,定义一个需要垂直居中的div元素,他的宽度和高度均为300px,背景色为橙色。代码如下:
<!DOCTYPE html>
<html lang="en">
<head>
    <meta charset="UTF-8">
    <title>index</title>
    <style>
        .content {
            width: 300px;
            height: 300px;
            background: orange;
        }
    </style>
</head>
<body>
    <div class="content"></div>
</body>
</html>
效果如下:
 我们需要使得这个橙色的div居中,到底该怎么办呢?首先我们实现水平居中,上面已经提到过了,可以通过设置margin: 0 auto实现水平居中,代码如下:
<!DOCTYPE html>
<html lang="en">
<head>
    <meta charset="UTF-8">
    <title>index</title>
    <style>
        .content {
            width: 300px;
            height: 300px;
            background: orange;
            margin: 0 auto;
        }
    </style>
</head>
<body>
    <div class="content"></div>
</body>
</html>
效果如下:
 很好,已经实现水平居中了!接下来该打大boss了——实现垂直居中。不过,在这之前,我们先要设置div元素的祖先元素html和body的高度为100%(因为他们默认是为0的),并且清除默认样式,即把margin和padding设置为0(如果不清除默认样式的话,浏览器就会出现滚动条,聪明的亲,自己想想问什么)。
<!DOCTYPE html>
<html lang="en">
<head>
    <meta charset="UTF-8">
    <title>index</title>
    <style>
        html, body {
            width: 100%;
            height: 100%;
            margin: 0;
            padding: 0;
        }
        .content {
            width: 300px;
            height: 300px;
            background: orange;
            margin: 0 auto; /*水平居中*/
        }
    </style>
</head>
<body>
    <div class="content"></div>
</body>
</html>
接下来,需要做的事情就是要让div往下移动了。我们都知道top属性可以使得元素向下偏移的。但是,由于默认情况下,由于position的值为static(静止的、不可以移动的),元素在文档流里是从上往下、从左到右紧密的布局的,我们不可以直接通过top、left等属性改变它的偏移。所以,想要移动元素的位置,就要把position设置为不是static的其他值,如relative,absolute,fixed等。然后,就可以通过top、bottom、right、left等属性使它在文档中发生位置偏移(注意,relative是不会使元素脱离文档流的,absolute和fixed则会!也就是说,relative会占据着移动之前的位置,但是absolute和fixed就不会)。设置了position: relative后的代码如下:
<!DOCTYPE html>
<html lang="en">
<head>
    <meta charset="UTF-8">
    <title>index</title>
    <style>
        html, body {
            width: 100%;
            height: 100%;
            margin: 0;
            padding: 0;
        }
        .content {
            width: 300px;
            height: 300px;
            background: orange;
            margin: 0 auto; /*水平居中*/
            position: relative; /*设置position属性*/
        }
    </style>
</head>
<body>
    <div class="content"></div>
</body>
</html>
我们刷新一下页面,发现跟之前是没有任何变化的,因为,我们仅仅是使设置了元素的position=relative而已,但是还没开始移动他的垂直偏移。好,下面我们就让它偏移吧!垂直偏移需要用到top属性,它的值可以是具体的像素,也可以是百分数。因为我们现在不知道父元素(即body)的具体高度,所以,是不可以通过具体像素来偏移的,而应该用百分数。既然是要让它居中嘛!好,那么我们就让它的值为50%不就行了吗?问题真的那么简单,我们来试一下,就设置50%试一下:
<!DOCTYPE html>
<html lang="en">
<head>
    <meta charset="UTF-8">
    <title>index</title>
    <style>
        html,body {
            width: 100%;
            height: 100%;
            margin: 0;
            padding: 0;
        }
        .content {
            width: 300px;
            height: 300px;
            background: orange;
            margin: 0 auto; /*水平居中*/
            position: relative; /*脱离文档流*/
            top: 50%; /*偏移*/
        }
    </style>
</head>
<body>
    <div class="content"></div>
</body>
</html>
效果如下图所示:
 div垂直方向上面并没有居中。明显是偏下了。下面,我们在浏览器中间画一条红线用来参考,如下图:
 通过观察上图,只要让div的中心移动到红线的位置,那么整个div就居中了。那怎么让它中心移动到红线处呢?从图中可以观察到,从div的中心到红线的距离是div自身高度的一半。这时候,我们可以使用通过margin-top属性来设置,因为div的自身高度是300,所以,需要设置他的margin-top值为-150。为什么是要设置成负数的呢?因为正数是向下偏移,我们是希望div向上偏移,所以应该是负数,如下:
<!DOCTYPE html>
<html lang="en">
<head>
    <meta charset="UTF-8">
    <title>index</title>
    <style>
        html,body {
            width: 100%;
            height: 100%;
            margin: 0;
            padding: 0;
        }
        .content {
            width: 300px;
            height: 300px;
            background: orange;
            margin: 0 auto; /*水平居中*/
            position: relative;
            top: 50%; /*偏移*/
            margin-top: -150px;
        }
    </style>
</head>
<body>
    <div class="content"></div>
</body>
</html>
效果如下:
 确实已经居中了。好兴奋!有木有?! 除了可以使用margin-top把div往上偏移之外,CSS3的transform属性也可以实现这个功能,通过设置div的transform: translateY(-50%),意思是使得div向上平移(translate)自身高度的一半(50%)。如下:
<!DOCTYPE html>
<html lang="en">
<head>
    <meta charset="UTF-8">
    <title>index</title>
    <style>
        html,body {
            width: 100%;
            height: 100%;
            margin: 0;
            padding: 0;
        }
        .content {
            width: 300px;
            height: 300px;
            background: orange;
            margin: 0 auto; /*水平居中*/
            position: relative;
            top: 50%; /*偏移*/
            transform: translateY(-50%);
        }
    </style>
</head>
<body>
    <div class="content"></div>
</body>
</html>
效果如下:
 上面的两种方法,我们都是基于设置div的top值为50%之后,再进行调整垂偏移量来实现居中的。如果使用CSS3的弹性布局(flex)的话,问题就会变得容易多了。使用CSS3的弹性布局很简单,只要设置父元素(这里是指body)的display的值为flex即可。具体代码如下,对代码不做过多的解释,如果想了解弹性布局的可以看阮一峰老师的博客
http://www.ruanyifeng.com/blog/2015/07/flex-grammar.html:
<!DOCTYPE html>
<html lang="en">
<head>
    <meta charset="UTF-8">
    <title>index</title>
    <style>
        html,body {
            width: 100%;
            height: 100%;
            margin: 0;
            padding: 0;
        }

        body {
            display: flex;
            align-items: center; /*定义body的元素垂直居中*/
            justify-content: center; /*定义body的里的元素水平居中*/
        }
        .content {
            width: 300px;
            height: 300px;
            background: orange;
        }
    </style>
</head>
<body>
    <div class="content"></div>
</body>
</html>
效果:
 除了上面3中方法之外,当然可能还存在许多的可以实现垂直居中的方法。比如可以将父容器设置为display:table ,然后将子元素也就是要垂直居中显示的元素设置为 display:table-cell 。但是,这是不值得推荐的,因为会破坏整体的布局。如果用table布局,那么为什么不直接使用table标签了?那不更加方便吗? 关于CSS实现垂直居中的方法,就写这么多了。如果,发现哪里写的不对的或者有更好的方法的,请在评论提出来,这样大家可以一起讨论、共同进步!
2018年8月24日更新 最近,看了张鑫旭老师的《CSS世界》一书,不采用CSS3,而是使用了CSS2的vertical-align,通过一些黑科技手段实现了垂直居中,有兴趣的同学可以研究一下。具体实现如下: 假设类名是.dialog,则 HTML 如下:
<div class="container">
  <div class="dialog">
  </div>
</div>
核心 CSS 代码如下:
.container {
    position: fixed;
    top: 0;
    right: 0;
    bottom: 0;
    left: 0;
    background-color: rgba(0,0,0,.5);
    text-align: center;
    font-size: 0;
    white-space: nowrap;
    overflow: auto;
}

.container:after {
    content: '';
    display: inline-block;
    height: 100%;
    vertical-align: middle;
}

.dialog {
    display: inline-block;
    vertical-align: middle;
    text-align: left;
    font-size: 14px;
    white-space: normal;
}
JS实现几分钟前,刚刚
function getDateDiff(dateTimeStamp) {
  var result;
  var minute = 1000 * 60;
  var hour = minute * 60;
  var day = hour * 24;
  var halfamonth = day * 15;
  var month = day * 30;
  var now = new Date().getTime();
  var diffValue = now - new Date(dateTimeStamp).getTime();
  if (diffValue < 0) {
    return;
  }
  var monthC = diffValue / month;
  var weekC = diffValue / (7 * day);
  var dayC = diffValue / day;
  var hourC = diffValue / hour;
  var minC = diffValue / minute;
  if (monthC >= 1) {
    if (monthC <= 12) result = "" + parseInt(monthC) + "月前";
    else {
      result = "" + parseInt(monthC / 12) + "年前";
    }
  } else if (weekC >= 1) {
    result = "" + parseInt(weekC) + "周前";
  } else if (dayC >= 1) {
    result = "" + parseInt(dayC) + "天前";
  } else if (hourC >= 1) {
    result = "" + parseInt(hourC) + "小时前";
  } else if (minC >= 1) {
    result = "" + parseInt(minC) + "分钟前";
  } else {
    result = "刚刚";
  }
  return result;
}